Has a virus or malware suddenly appeared on your computer? Do you want to try to remove it yourself. Here’s a Do It Yourself guide to removing a simple computer virus.
This guide will be useful in cases where a computer virus or other malware has suddenly appeared on your computer. By that I mean that you are now getting popups or full screen images blocking your desktop.
Or perhaps you are getting messages from what looks like anti-virus software, but you know it’s not really your anti-virus. We call these rogue anti-virus programs, and their sole purpose is to scare you into buying some useless product in the hope of removing a virus.
Please follow these steps in the exact order they appear.
STEP 1. Don’t Panic!
The majority of viruses can be removed without causing lasting damage to your computer or your files. If in any doubt, consult a computer repair professional. But in many cases you can attempt to remove the computer virus or malware yourself.
If you are going to follow this guide, please print out these instructions first, so that you can have it sitting beside you while you work through the steps.
If a computer virus has installed itself recently, and bad things are now happening every time you start up your computer, there are two main things you need to do.
First – you need to stop that computer virus program from starting up at boot time because it can’t be properly removed if it is actively running.
And second – you need to remove the actual computer virus files that it has installed on to your machine.
STEP 2. System Restore to a point before the Computer Virus appeared
To stop the computer virus or malware program from starting up every time you boot your computer, you can use the Windows facility for System Restore to rollback your settings to a previous point in time. Somewhere buried in your registry, there is a setting that tells the computer virus program to startup at boot time.
It is beyond the scope of this article to try to find this registry setting, so the simplest route is to use System Restore. What this will do is restore your registry settings to exactly what they were yesterday, or the day before, or various dates in the past.
Please Note: System Restore will not affect any of your personal files (emails, pictures, documents, music, etc). You will not lose any of your files by running System Restore. It does not roll back your entire computer. It only rolls back the registry and some core Windows files.
What you need to do is work out exactly when you first noticed the computer virus activity, popups, etc. Write down that date. You will want to restore the registry to at least a day or two before that date. Because that good copy of your registry will have no record of wanting to start up the virus program.
Once we restore to that good copy, the computer virus will not start up when you boot your computer. Which gives you an opportunity to remove the leftover files.
Depending on how infected your computer is, you may or may not have access to System Restore after booting your computer normally. So I prefer to run System Restore from Windows Safe Mode.
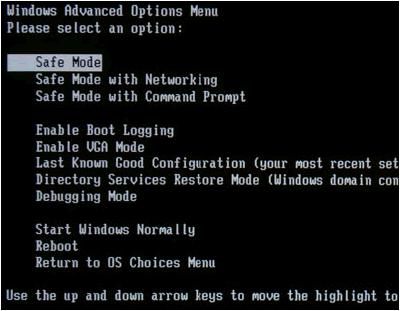
To access Windows Safe Mode, start up your computer, and as soon as the manufacturer’s logo disappears, starting pressing F8 repeatedly. After a few seconds, a special black and white menu will appear, and you can choose from several boot options.
Depending on your exact version of Windows, the options presented might vary slightly, but Safe Mode will always be listed in the menu.
Select the option called Safe Mode and press Enter. Windows will then boot up into Safe Mode.
When Windows starts up, don’t worry that Windows Safe Mode looks a bit strange compared to your normal view of Windows.
Because it is Safe Mode (which is typically only used for correcting Windows problems), it only loads the bare minimum of drivers that are absolutely necessary to get Windows running, so graphics will look a little strange.
Now you need to start System Restore.
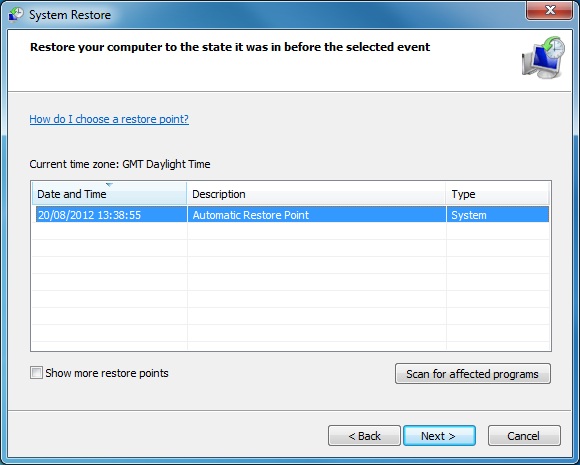
On Windows XP, Windows Vista and Windows 7, go to Start->All Programs->Accessories->System Tools->System Restore.
When a list of restore points is displayed, pick one that is at least a day or two before the date the computer virus first appeared. Then click Next or OK until the program starts restoring your registry settings.
When it is done, you will need to reboot your computer. When the computer restarts, you should be able to get back into Windows normally (don’t press F8 this time) and the computer virus or malware should not be popping up.
This doesn’t means that it is removed, but it is just not starting up at boot time.
If the popups are still appearing, try the whole System Restore process again, but go back a few more days into the past to get a good restore point.
Next we need to remove the computer virus files.
STEP 3. MalwareBytes Anti-Malware Scan
Before you run a scan with your anti-virus program, I strongly recommend running a full scan with MalwareBytes Anti-Malware. This is a fantastic, free anti-malware scanner which picks up many things that your ordinary anti-virus program will miss.
So download MalwareBytes Anti-Malware from the internet, install it, and run a Full Scan. Remove all of the nasty files that it finds by making sure they are ticked and then click the Remove button.
Full step by step details can be found in my post about MalwareBytes Anti-Malware.
STEP 4. Anti-Virus Scan
Next you will want to run a full scan using your anti-virus program. (I am assuming here that you have an anti-virus program installed. If you don’t, some decent ones are Norton, AVG or Kaspersky. Download and install one if you don’t currently have an anti-virus program installed.)
Each anti-virus program has slightly different instructions, but if you double click on it, you should get a new window on your screen. Follow the link or button to run scans, and make sure to select a Full Scan to make sure you are checking you whole hard drive for nasty files.
When the scan is finished, make sure that it has removed all of the files. Depending on which anti-virus you have, sometimes there will be a button to press to Remove or Quarantine the files. Make sure to click it.
STEP 5. Sit Back & Relax
If all has gone well, and your virus was one of these easily removed ones, you should now have a clean computer. Give yourself a Well Done and bask in the glow of fixing your computer yourself.
If you were happy to do these steps yourself, why not try our Computer Tune Up Guide as well.
Please Note: This computer virus removal guide is intended for home computer users who have a basic understanding of Microsoft Windows and running straightforward tools. This is not a replacement for hiring an experienced computer repair professional to remove a computer virus or malware on your behalf. However, in simple, straightforward cases of noticing sudden virus infection (it’s here today but wasn’t there yesterday) these steps can remove the problem in a large percentage of cases. There are additional steps and tools that a computer repair professional will use that are beyond the scope of this home computer user article, so if in any doubt, ask your computer repair guy for help.


Before starting the virus removal process, make sure that all of your important data is backed up. This will ensure that nothing of value is lost if the computer has to be completely reformatted, and you can get back up and running with minimal time invested.
This happened to me the company was DIR Assist. no. 520-555-0128
Just received a phone call, Asian accent, stating she was from Microsoft and detected “On-line Hidden Infection & Germ files”, 1/25/14. This is Saturday, why you bothering me on a Saturday, and she went through her lines, and as soon as she stated “ACCESS YOUR COMPUTER” I KEYED IN THE “ON-LINE HIDDEN INFECTION SCAM’ AND I am writing this to say thank you for the warning, and how to look for hidden infection instructions, and I want to let you know they are still active as of today. “Access my computer” sent up the RED FLAG, I did also ask..How do I know you are from Windows/Microsoft, and she stated everything said in the Warning!
there’s this virus that corrupt every folder in any external device i put in my laptop. it turns them to shortcuts. i have tried AVG, Avast and Avira. whenever i try scanning my system, it hlts. the virus had been on my system for over 6 months now. ehat cn i possibly do.
was asking if a phonecall from microsoft about a virus was a scam this helped as it told me it is a scam so keepin my computer safe thank u